It’s like the math is the seeds or DNA and the code is the fertile ground and the sun shines, or in our case electricity flows to CPUs and GPUs.
Ever pondered the possibilities when algorithms dabble in the divine art of mathematics? Prepare yourselves for TMDNE – where Stable Diffusion meets the blackboard of the mind! 🧮🤯
Inspired by the brilliance of projects like “This Waifu Does Not Exist” (TWDNE) by Gwern Branwen, TMDNE takes a quantum leap into the realm of imaginary mathematicians. These aren’t your conventional number crunchers; they’re the brainchildren of algorithms, immersed in the ethereal dance of imaginary theorems and proofs. 🎨➗
Much like TWDNE introduced us to AI-generated characters that captured our otaku hearts, TMDNE invites you to witness the magic of machine learning as it conjures up mathematical maestros who never attended a single conference. 🤓📚
Get ready for a symphony of computational creativity, where algorithms showcase their virtuosity in crafting mathematicians who not only ponder the mysteries of prime numbers but might just solve the Riemann Hypothesis over a cup of virtual coffee. ☕📏
Embark on this intellectual odyssey where Stable Diffusion meets the abstract canvas of mathematical imagination, proving that in the world of artificial intelligence, even mathematicians can be a product of algorithmic brilliance! 🔢🤖
Grid Search in Stable Diffusion
The images in the following video were created by doing a grid search with Stable Diffusion, with slight variations of words in the prompt and scanning the guidance scale. The seed value remained constant. The images were also audited manually for obvious artifacts and flaws.
Finally a slideshow was created by using the following ffmpeg command:
This results in a slide show with a change every three seconds on the images.
The Idea
Math -> AI -> Imaginary Mathematicians
OK, AI is math really, a bunch of chain rule linkage and matrix multiplies for the most part and to make it do something useful the math gets worked into code as the substrate. It’s like the math is the seeds or DNA and the code is the fertile ground and the sun shines, or in our case electricity flows to CPUs and GPUs. In 2024, it’s gotten really good. imagine generation that is. I did some AI image modification years ago but, Stable Diffusion has gone way far, fast. So wouldn’t it be interesting and humorous to generate images of math being worked on, by a mathematician generated by AI. As can be seen from the images, this points out a weakness too. People, it kind of nails it, backgrounds too. Text and numbers, not so much. I’ll be interested in seeing it nail this too, only a matter of time.
Grid Search & Ground Rules
As an AI researcher, I am always interested in pushing the boundaries and grid search is something that is a normal event for me. I’ve played with Stable Diffusion for quite a while and I was interested in seeing what a semi-serious grid search would reveal now that it is seriously capable of generating graphics. I decided to stick with images that are not ‘fantasy’ or too enhanced to keep them real looking so that they are easier to judge.Keeping the ‘look’ in the same zone also helped keep some degree of uniformity but, Stable Diffusion varies the image within a range that seems to work well.
Yet another sidequest
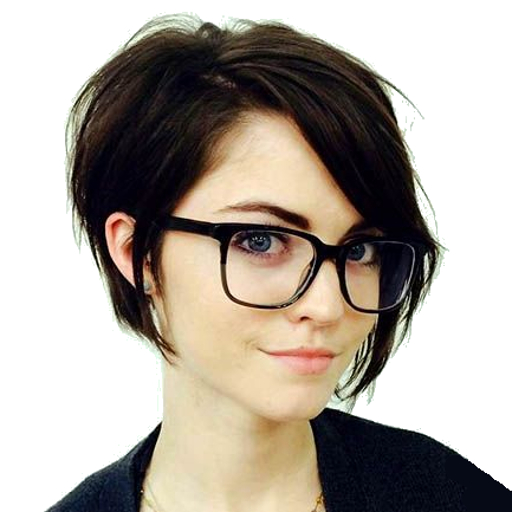
This started as a bit of a sidequest as I am working on a project called TinyMath that is all about identifying how small a GPT model can get and get a passing grade for math. This way it is possible to score objectively and see how model size and loss stack up against the ground truth of taking an ‘exam’. I just happened to create an image using Stable Diffusion of Misato Katsuragi from Neon Genesis Evangelion at a blackboard working out some math when I was pondering this, kind of a nod to TWDNE on a document I wrote on makemore. That combined with an image that I saw in 2020 when my partner Renee was searching for a new hair style, was another inspiration. The image below only shows a partial view of the woman and I often wondered if the other views were out there somewhere, or could AI come close to generating the other views.
The Two Images that got TMDNE going
Misato Katsuragi as a Math TeacherLayered Stacked Bob for thick hair. Great style and color.
Notes & References
TWDNE
“This Waifu Does Not Exist” (TWDNE) is a project created by Gwern Branwen. It involves the generation of images of fictional characters using Generative Adversarial Networks (GANs). GANs are a type of artificial intelligence algorithm that can generate realistic-looking images based on patterns learned from a dataset.
In the case of TWDNE, the GANs are trained on a dataset of anime-style characters, and the output is entirely computer-generated images of characters that do not exist in reality. The term “waifu” is a romanization of the Japanese word for “wife” and is often used in fandom to refer to fictional characters, especially those from anime and manga, for whom someone has a strong emotional attachment.
It’s worth noting that the images generated by TWDNE are not real individuals, but rather creations of the algorithm based on the patterns it learned during training. The project is an interesting example of the capabilities of AI in generating realistic-looking content.
Prompts, Seed and Range for Guidance
Styles Tried:
sai-photograpic
None
cinematic-default
Seed: 52794693
Positive Prompts:
young woman with short red hair in graduated bob style teaching math at a blackboard
young woman with short red hair in posh bob style teaching math at a blackboard
young woman with short red hair in victoria beckham posh bob style teaching math at a blackboard
young woman with short red hair stacked with very short stacked layers in the back teaching math at a blackboard
young woman with short red hair stacked with very short stacked layers in the back teaching math at a blackboard
Negative Prompt:
bangs curls
…. bangs were sometimes screwed up and curls caused artifacts, so these were filtered on.
Guidance range: 5-18.5 ( found to be best)
Additionally, the results were judged by looking at the images for excess artifacts or distortions such as missing fingers, awkward postures and anything else unrealistic beyond the fact that Stable Diffusion is still limited in terms of representing numbers and letters.
While playing around with Stable Diffusion, I realized that I must have misspelled “Budgerigar” and was surprised to see the monstrous images that it generated. Perhaps I accidentally typed “Buddigar” or some other variation, resulting in the strange images below. Some of them resemble monsters, while others appear to be stores from a distant land outside of the USA.
These images fall into the uncanny valley of creepiness. For instance, I heard on a Lex Fridman podcast that image generators sometimes struggle with creating realistic facial expressions. It’s fascinating to observe what Stable Diffusion produces when prompted to generate an image of a person with a surprised expression. Although the results can be unsettling and bizarre, they’re also quite amusing, like this one….
OMG,I spot a Buddigar!!!!!
Buddigars
The first one is my favorite in terms of shock and awe.
Buddigar: It’s like Golem’s Pet.
Buddigar tale by ChatGPT (mostly, just with a bit of prompting and edits)
There is a mischievous creature named Buddigar. It’s small and furry, with sharp claws and bright, beady eyes that seemed to sparkle with mischief. Buddigar loves nothing more than causing trouble, and it has a talent for doing so in the most unexpected ways.
If you can’t find your keys, Buddigar is probably to blame. It has a habit of sneaking into people’s pockets and snatching whatever shiny object catches its eye. It wasn’t that Buddigar has any use for these trinkets – it simply enjoys hoarding them, like a dragon with its treasure.
And if your computer is running slow, you could bet that Buddigar had something to do with it. It has a knack for hiding files, moving icons, and generally wreaking havoc on any device it comes across. Even the most tech-savvy of users are no match for Buddigar’s cunning ways.
But Buddigar’s mischief isn’t limited to material possessions. It has a strange talent for causing physical ailments, too. If you have a pain in your hip, for instance, you could be sure that Buddigar has something to do with it. It’s not that Buddigar means to hurt anyone – it simply enjoys the chaos that its actions cause.
The funny thing is, Buddigar doesn’t try to hide its misdeeds. When caught in the act, it simply grunts and declares its mischievous intent proudly. “Buddigar!” it exclaims, with a mischievous twinkle in its eye. “Buddigar take keys! Buddigar slow computer! Buddigar make hip hurt!” And then it scampers away, leaving behind a trail of chaos and confusion.
Despite its mischievous nature, however, Buddigar is impossible to hate. There is just something endearing about its playful antics, and the way it seemed to revel in the chaos it caused. Even Gollum, the famously twisted and corrupted creature from Lord of the Rings, would have adored Buddigar’s mischievous ways. It is so ugly it’s almost gone full circle to cute in an uncanny way.
And so, Buddigar continues to roam the land, causing trouble wherever it goes. Some curse its name, while others simply laugh and shake their heads in amusement. But love it or hate it, there was no denying that Buddigar is one of a kind – a little creature with a talent for mischief that it’s unmatched by any other.
Only the imagination grows out of its limitations.
In the example shown in the previous post I used 20 iterations at 512×512. A few lingering questions that might be asked are…
What about more iterations?
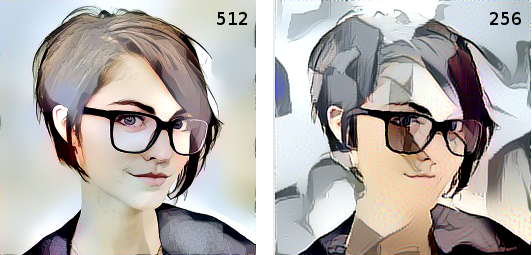
What about a lower resolution, like 256×256 ?
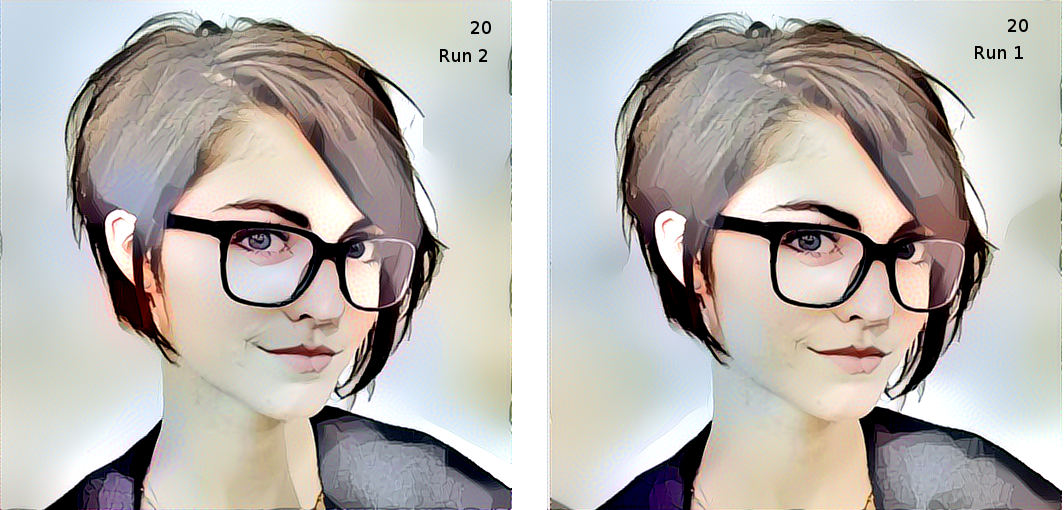
Machine learning code typical initializes using random parameters will this affect the image in another identical run ?
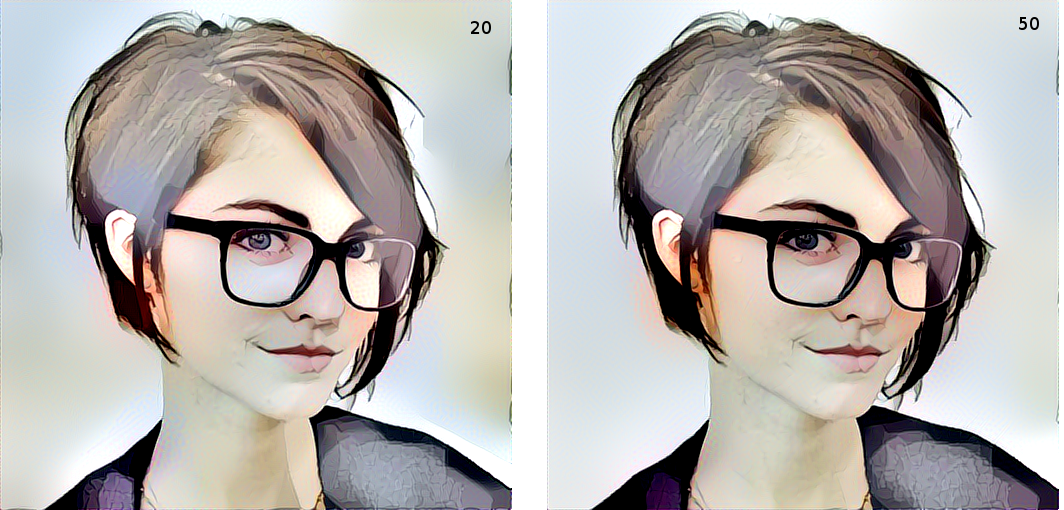
20 Iterations and 50 Iterations
More iterations up to a point make for a better image. There is a point where the loss value deltas get smaller between iterations and a point of diminishing returns is reached. Not much difference that can be seen happens beyond 20 iterations for this run. There are minor details that have changed but you have to really look carefully to pick them out.
Start of iteration 0
Current loss value: 1.68853e+11
Iteration 0 completed in 672s
Start of iteration 1
Current loss value: 1.06826e+11
Iteration 1 completed in 616s
Start of iteration 2
Current loss value: 7.61243e+10
Iteration 2 completed in 594s
Start of iteration 3
Current loss value: 5.69757e+10
Iteration 3 completed in 501s
Start of iteration 4
Current loss value: 4.73256e+10
Iteration 4 completed in 496s
Start of iteration 5
…..
Start of iteration 9
Current loss value: 3.22461e+10
Iteration 9 completed in 498s
……
Start of iteration 19
Current loss value: 2.63259e+10
Iteration 19 completed in 471s
…….
Start of iteration 49
Current loss value: 2.26513e+10
Iteration 49 completed in 592s
Lower Resolution
The model will perform poorly on lower resolutions, even with 20 iterations, 256×256 will look sloppy and abstract. The only reason to go this low would be to run a bunch of iterations fast to see if it worth trying at higher resolution. Kind of like a preview. On my machine the 256×256 iterations run about 5x faster than the 512×512 iterations.
Random Initialization
Because the machine learning model loads itself with random weights and biases at the start of a model run and works from that as a starting point there is some variations in the results from run to run. This can be seen in theses images as there are slight variations in the results. Sometimes it is worth running the model over and over and then hand picking the best result from a batch of outputs.
As an aside. In some machine learning code it is possible to seed the random number generator so that the random starting point is not really random but seeded to be able to reproduce the same results. Occasionally I have had to do this when training genetic algorithms for trading, hand built code, so total control on my part. I basically want a reference run against which I can gauge future changes to the code against. By using a standard set of input, a fixed time series and seeded random initialization, I get the same tuning every time. Then if a change happens in the code, I know it is a code change and not in the data. Have a reference copy archive makes it reproducible.
Only the imagination grows out of its limitations.
A while ago I played around with some code that was based on the following paper. One of the first things that I tried it on was a sample of the famous wave painting, styled by an actual wave.
A Neural Algorithm of Artistic Style
Leon A. Gatys,1,2,3∗Alexander S. Ecker,1,2,4,5Matthias Bethge1,2,41Werner Reichardt Centre for Integrative Neuroscienceand Institute of Theoretical Physics, University of T ̈ubingen, Germany2Bernstein Center for Computational Neuroscience, T ̈ubingen, Germany3Graduate School for Neural Information Processing, T ̈ubingen, Germany4Max Planck Institute for Biological Cybernetics, T ̈ubingen, Germany5Department of Neuroscience, Baylor College of Medicine, Houston, TX, USA∗
Fine art, especially painting, humans have mastered the skill to create unique visual experiences through composing a complex interplay between the con-tent and style of an image. Thus far the algorithmic basis of this process is unknown and there exists no artificial system with similar capabilities. How-ever, in other key areas of visual perception such as object and face recognition near-human performance was recently demonstrated by a class of biologically inspired vision models called Deep Neural Networks.1, 2Here we introduce an artificial system based on a Deep Neural Network that creates artistic images of high perceptual quality. The system uses neural representations to sepa-rate and recombine content and style of arbitrary images, providing a neural algorithm for the creation of artistic images. Moreover, in light of the strik-ing similarities between performance-optimised artificial neural networks and biological vision,3–7our work offers a path forward to an algorithmic under-standing of how humans create and perceive artistic imagery.1arXiv:1508.06576v2 [cs.CV] 2 Sep 2015
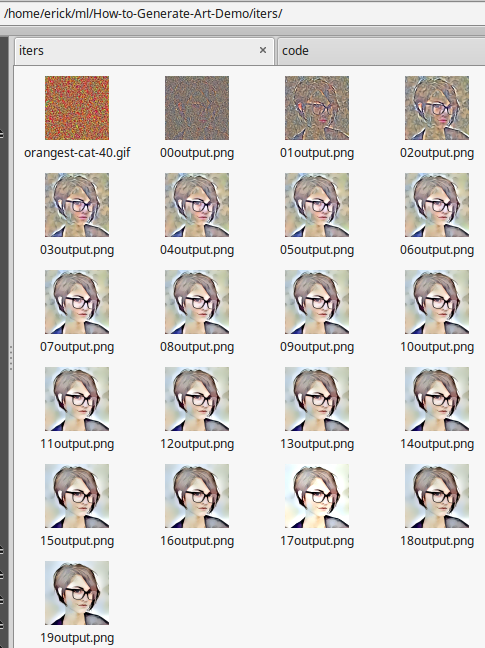
This post covers code that I have played with that applies a style to an image. The code is derived from Siraj Raval’s work. I was interested in having a version that would run outside of a Python Jupyter notebook. The idea is to have a version that can be run from the command line. This allows for it to be run ‘production’ style. This means have it set with images and parameters and run right from the command line. I found a way to convert the code from Jupyter notebook code to straight Python. The exact method I can’t remember right now. The code also produces intermediate frames while running, one per iteration. These are stored in the itersdirectory. They can be used to monitor the models progress and optionally generate an animated GIF showing the unfolding of the process.
I have conda installed on my machine, so the dependency aka, requirements text file was used to load dependencies, following setup of the environment. This virtual environment makes sure that there are no collisions with other code environments, including the base. I did not want to upset anything that I depend on over an experiment. It can also be put under a virtual environment in Python. This is not a requirement but, good practice when developing code. It helps to keep the code in its own confined space and makes things work in a repeatable way. Making it easy to replicate the work of others in a controlled way. Sometimes it helps to be able to troubleshoot issues by switching between environments too.
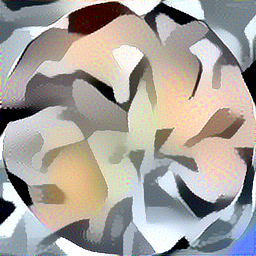
Bear in mind that bigger resolution values will take longer than small. The memory requirements increase fast with resolution increases. I was only able to run 256 resolution on a machine with 4GB. I also tried to make thumbnail size images but, the model seems to have issues with smaller images, it produced distorted results. With a machine that has 16GB of RAM, it was easy to create 512 and 1024 pixel square images. When in doubt, monitor memory usage via the top command. The giveaway is swap gets used heavily with a large image. Even with a decent SSD and it having swap mounted on it, a machine might grind down to terrible lags in response, if swap is used dynamically on a heavy basis . Then the option is just to kill the process and make sure RAM is de allocated. This is really the only issue with running this code, memory use. If you have enough, it’s load up the dependencies and go.
It is currently ‘live’. What I mean by that is that it is a symlink to the working directory on my main machine that is rsync’d ( rsync options -avhLK) to it’s location online. So, it is subject to change, you may see things get added in, I may break links accidentally too, hopefully not. If something is obviously broken, shout out in a comment and I can fix it. I might eventually load code to Github as a static repository.
Note the images directory. Also under it is the styles directory. I have added a few more examples beyond what Siraj Raval had. Mostly downloaded from 4chan while scrolling through wallpaper and some random images that were collected on my machine from wherever. Plus a few that I made for doing references against a simple image, such as a red dot , red and black dot and grid lines.
Plain is a directory that contains the original Siraj Raval code for reference.
Images and styles, contain a sampling of images to try. In the code the image location for initial image and style image are hard coded. Look around line 37 to line 52 for…
content_image_path
and
style_image_path
and you will see examples that can be switched in and out via mask commenting the lines out. Change it as needed.Plus try your own for fun.
Adjust parameters if needed. Look for them around line 152 under the line with …
# In[51]:
Also around line 305 is the iterations variable which can be adjusted.
There are some samples of output that were generated in the top level directory. This is where the output is dumped as output.png. I just kept renaming the interesting images to useful names as I kept playing with various image and style combinations. You have to rename output.png as it will be overwritten when a new run occurs. It is possible to run rm ??output.png to delete them. It is possible to put this line in the script and activate. It is in the script but I have it commented out because I did not want to blast all of the output.png’s away when the gif is made.
iters directory contains animated gifs of the images and a BASH script that is used to make the animated gifs.
notes.txt was a sketch of of the names for the virtual environment and conda environment, setups on two different machines. I might add other info and issues I find in this file.
Example of styling an image
Real 3D Person 512×512 as input from images/animeAnime 2D Person for the styling image, from images/style/anime
To get my bearings straight on this code again, I ran an example to make sure I understand it, it still runs. Hopefully others can gain insight into what a proper run does.
Input Images
Above I have two images, one the initial image and the second the style. The initial and styling image are both cropped to be 512×512 pixels, re-scaling as needed. Re-scaling is not necessary, except for the fact that the program will re-scale and if the proportions are not square, the resultant image will be stretched or squished.
On the first one there was a bit of a haze of blue to the right that I bucket filled to white so it wouldn’t get styled as well. From extending the photo to a larger canvas to make square this blue haze was an obvious line of demarcation. Plus her shoulder was truncated, so I filled that in a bit to make things look better. The anime image for styling was just cropped square and re-scaled too and flipped. Not sure if it makes a difference but, I looked for images that were close-ish in look and pose and set the same orientation.
Memory Usage and Performance
My machine, an i5, Sandy Bridge OptiPlex-790, can be see taking around 500-700 seconds per epoch. It was also running other code at the time, tuning parameters for algo trading code, so all the cores were not focused on making the images. Plus, all the miscellaneous stuff running, mail, browser with too many tabs open, it is using 1/2 core just doing that. But, 20 loops through the code is not a long time, really. You can see below that a fair amount of memory is being used, including some swap. But, the machine is not slowing down at all. I think some of the swap is just used up on other things and may not have been de-allocated over time, so it’s more or less static swap now.
While this code is running it will be copying png’s of the process into the iters directory. This lets you get a peek into the models progress and it is possible to use these later in conjunction with the make-gif-.sh in that directory to make an animated GIF of the model ‘building’ the final image. The copies starting from 00output.png and so on up to the last epoch number (The prefixing and order matter for the script to generate an animation) are a clue as to if things are going right. If after a few images, things look way off base or you question what direction the results are going, viewing the intermediate images give you a chance to abort early. There is a line in the file at the end that will optionally remove the output.png’s using rm ??output.png.
Iters Directory Showing Intermediate Copies
Command Line Output
From my command line this is what I see when it runs. Change to the directory, activate conda environment for the art-demo and fire off python demo-512.py. (I created another called demo-512-anime+human.py to replicate the example in this post ) Soon it spins up, well the fans on the machine do as well, Python grabs all the CPU power it can on all available cores so soon you will hear the power of machine learning as the fans kick to max RPM. Time goes by as the iterations of epochs run, 20 in this case. As long as the very high loss value is coming down, work is being done. As can be seen there is a point of diminishing returns beyond which not much is to be gained. This also can be assessed by looking at the progression of images in the iters directory. After it runs, it quits and a final output.png will appear in the top level, for me the ~/ml/How-to-Generate-Art-Demo/ directory, same directory the code is run from. Nothing special about ~/ml other than it is the place I keep all the machine learning code.
Note the warnings: I did not notice this right away but the Tensorflow install was not compiled to use SSE3,4.X and AVX. I retried a few loops of this example at 256×256 in my base install where Tensorflow seems to be compiled with these features and it yields 40% speed improvement.
(base) erick@OptiPlex-790 ~ $ cd ~/ml/How-to-Generate-Art-Demo/
(base) erick@OptiPlex-790 ~/ml/How-to-Generate-Art-Demo $ conda activate art-demo
(art-demo) erick@OptiPlex-790 ~/ml/How-to-Generate-Art-Demo $ python demo-512.py
Using TensorFlow backend.
(1, 512, 512, 3)
(1, 512, 512, 3)
W tensorflow/core/platform/cpu_feature_guard.cc:45] The TensorFlow library wasn't compiled to use SSE3 instructions, but these are available on your machine and could speed up CPU computations.
W tensorflow/core/platform/cpu_feature_guard.cc:45] The TensorFlow library wasn't compiled to use SSE4.1 instructions, but these are available on your machine and could speed up CPU computations.
W tensorflow/core/platform/cpu_feature_guard.cc:45] The TensorFlow library wasn't compiled to use SSE4.2 instructions, but these are available on your machine and could speed up CPU computations.
W tensorflow/core/platform/cpu_feature_guard.cc:45] The TensorFlow library wasn't compiled to use AVX instructions, but these are available on your machine and could speed up CPU computations.
Start of iteration 0
Current loss value: 1.68822e+11
Iteration 0 completed in 511s
Start of iteration 1
Current loss value: 1.05267e+11
Iteration 1 completed in 480s
Start of iteration 2
Current loss value: 7.54607e+10
Iteration 2 completed in 459s
Start of iteration 3
Current loss value: 5.67734e+10
Iteration 3 completed in 489s
Start of iteration 4
Current loss value: 4.71848e+10
Iteration 4 completed in 518s
Start of iteration 5
Current loss value: 4.19099e+10
Iteration 5 completed in 513s
Start of iteration 6
Current loss value: 3.82277e+10
Iteration 6 completed in 533s
Start of iteration 7
Current loss value: 3.56423e+10
Iteration 7 completed in 508s
Start of iteration 8
Current loss value: 3.36591e+10
Iteration 8 completed in 498s
Start of iteration 9
Current loss value: 3.21125e+10
Iteration 9 completed in 441s
Start of iteration 10
Current loss value: 3.08934e+10
Iteration 10 completed in 610s
Start of iteration 11
Current loss value: 2.9882e+10
Iteration 11 completed in 516s
Start of iteration 12
Current loss value: 2.90331e+10
Iteration 12 completed in 495s
Start of iteration 13
Current loss value: 2.82984e+10
Iteration 13 completed in 499s
Start of iteration 14
Current loss value: 2.76652e+10
Iteration 14 completed in 495s
Start of iteration 15
Current loss value: 2.70985e+10
Iteration 15 completed in 530s
Start of iteration 16
Current loss value: 2.66107e+10
Iteration 16 completed in 86288s
Start of iteration 17
Current loss value: 2.61579e+10
Iteration 17 completed in 526s
Start of iteration 18
Current loss value: 2.57533e+10
Iteration 18 completed in 642s
Start of iteration 19
Current loss value: 2.53972e+10
Iteration 19 completed in 717s
(art-demo) erick@OptiPlex-790 ~/ml/How-to-Generate-Art-Demo $
The output file appears in the same directory
(art-demo) erick@OptiPlex-790 ~/ml/How-to-Generate-Art-Demo $ ls output.png
output.png
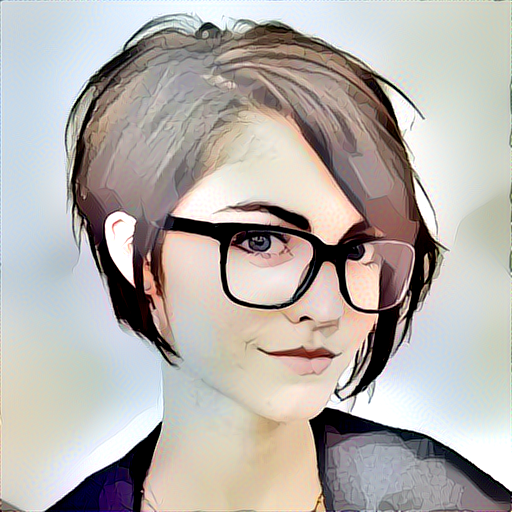
Final Result
Final after 20 iterations Human + Anime (style image) = Humanime?
Animated GIF
To make an animated GIF from the output files in the iters directory. (Note, in Linux the program Convert must be installed if it is not already installed in the distribution that is being used). Go to the iters directory, make sure that there are no extraneous output.png files from previous runs. This can happen if a previous run was made that was longer, more iterations and generated numbered outputs above the last iteration. Then run…
In a few seconds a file called animation.gif will appear. Rename the file if you want to keep it as any future work may write over it.
The code is well commented and easy to tweak, thanks to Siraj Raval. I will end with one part of the conclusion , it’s appropriate as a final word.
# It's now your turn to play! Try changing the input images, their sizes, the weights of the different loss functions, the features used to construct them and enjoy different sorts of output. If you end up creating something you truly wish to share, [please do so](https://twitter.com/copingbear)!
Resources
Original work is on GitHub provided by Siraj Raval